In SQL Server, the Referential Integrity is governed by the fact that there is a defined primary key that will only ever allow unique values. That primary key is used to establish relationships with other tables. This article shows you how to create primary keys in SQL Server. The concept of referential integrity requires two things, a unique value on the parent and a relationship to a child table through that unique value.
This article is based on Learn SQL Server 2012 in a Month of Lunches, to be published in Fall 2012. This eBook is available through the Manning Early Access Program (MEAP). Download the eBook instantly from manning.com. All print book purchases include free digital formats (PDF, ePub and Kindle). Visit the book’s page for more information based on Learn SQL Server 2012 in a Month of Lunches. This content is being reproduced here by permission from Manning Publications.
Author: Grant B. Fritchey
 You will need to work very closely with the client in order to define exactly what column or columns make a row unique. Very often, this will be difficult for a business to define, but you will need to persist in order to be sure that you can properly maintain the integrity of the data to be stored. This is challenging for a business to define partly because people just don’t think in terms of “unique values.” They are more likely to make such decisions while they have a user experience. But, invariably, there’s a way to uniquely identify almost any concept that business can come up with. You just have to work with them to find that definition.
Creating a primary key is quite simple. Let’s start with the Table Designer.
Primary keys through the Table Designer
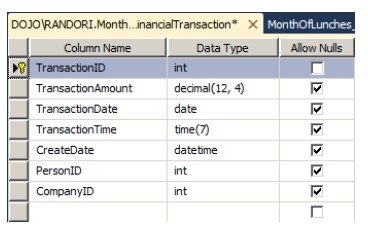
Navigate to the Finance.FinancialTransaction table in the Object Explorer. Right-click on the table and select Design from the context menu. This will open the Table Designer window. This table already has a field that is a candidate for being a primary key, the TransactionID column. This is a candidate because it is defined as an identity column. Identity values will be generated automatically as rows get inserted. Click on the grid to the left of that column in order to select it.
To set that column as a primary key, you have a couple of choices. If you right-click on the column in the Table Designer window, the context menu will show an option, right at the top, labeled Set Primary Key. Selecting this will make the column into a primary key. Another option is to use the Table Designer toolbar. Click on icon that is a picture of a key. That will set the column or columns selected as the primary key. Using either one of these methods, make the TransactionID column the primary key for this table. Your results should look like figure 1.

Figure 1 The TransactionID column has been set as the primary key for the Finance.FinancialTransaction table as shown by the little key icon
All you have to do now is click the Save button and the table will be saved with a primary key. It’s that easy.
There are a few restrictions that you have to take into account. The data already in the table, if any, must be unique, or you’ll get an error. The column can’t allow NULL values or you’ll get an error. But that’s pretty much it.
TRY IT NOW Create a primary key on a table and save the changes to that table using the Table Designer.
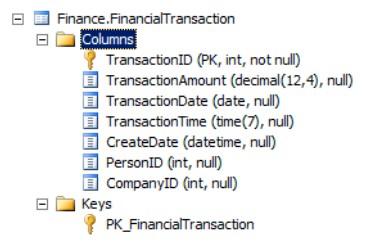
If you refresh tables list in the Object Explorer and then expand the columns on the Finance. FinancialTransaction table, you’ll see the primary key in place on the table, and you can expand the Keys folder to see the primary key definition itself as shown in figure 2.

Figure 2 Column list showing the new primary key on the TransactionID column as represented by the Key icon.
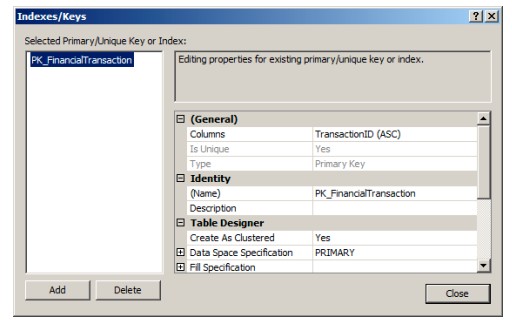
By creating the primary key the way we did, we allowed several default behaviors to occur. First, we didn’t provide a name, so SQL Server provided one for us, PK_FinancialTransaction. It’s completely acceptable to use the default names, but some people like to establish their own naming standards. So, there has to be a way to control how a primary key gets created. There is. Right-click anywhere in the main Table Designer window. This opens the context menu. From that you can select Indexes/Keys…, which will open the Indexes/Keys window. Since a primary key has already been created, you should see the PK_FinancialTransaction key in this window as shown in figure 3.

Figure 3 The Indexes/Keys window, which will allow you to edit the properties of the primary key
If there were no primary key on the table, you could define one from this window just by filling out the appropriate information. Some of that information is only available when creating the primary key, such as the Type value that is highlighted in the figure. But the other values can be edited. You can adjust the column or columns that define the key. You can change the name of the key or provide a description. Some of the other properties are fairly complex and won’t be covered here, but one property does need a little attention, Create As Clustered. Indexes are constructs that help you speed up data access, among other functions. A primary key is also an index and, by default, created as a clustered index. There can only be a single clustered index on a table. The best place to put a clustered index is usually on the column or columns that are most frequently used to access data. Frequently, this is the primary key. However, it’s very important that separate the two. There can be one primary key on a table and there can be one clustered index on a table. But they don’t have to be the same.
TRY IT NOW Experiment with the Indexes/Keys window to see how it differs from the Table Designer.
Close this window and save and close the Table Designer. It’s time to create another primary key, but this time with TSQL.
Creating primary keys with TSQL
There are actually a couple of ways to create a primary key with TSQL. You can use the ALTER TABLE script to add a primary key to the table, or you can create a primary key as part of the table definition, directly. There’s very little difference in the outcome.
ALTER TABLE for a primary key
This TSQL statement will alter the table Management.Address to create a primary key. Notice that I’m supplying most settings. There are slightly fewer defaults for you to take advantage of when compared to the GUI.
ALTER TABLE Management.Address

ADD CONSTRAINT PK_Address

PRIMARY KEY (AddressID);
You have to tell it which table you’re altering. Then we’re adding a very particular type of constraint called a primary key with a name, PK_Address. The column on which it’s being placed is inside the parenthesis.
Because I didn’t define whether or not this is clustered, it will be automatic if a clustered index on the table is not there. If you wanted to make it a nonclustered primary key, you can tell it that like this:
ALTER TABLE Management.Address

ADD CONSTRAINT PK_Address

PRIMARY KEY NONCLUSTERED (AddressID);
You can’t run this script if you already ran the last one because the primary key is in place. But, you can remove a primary key if you need to. It uses the ALTER TABLE script as well:
ALTER TABLE Management.Address

DROP CONSTRAINT PK_Address;
But, you can’t drop a primary key if it’s referenced by a foreign key. You’ll have to drop all the foreign keys first.
TRY IT NOW Create a primary key by using the ALTER TABLE statement.
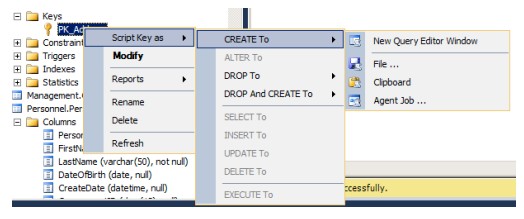
You can see the column or columns that have been defined as the primary key by looking at the column list in Object Explorer. You can’t tell anything about it such as if it’s clustered. The best way to examine the primary key is to look at the TSQL used to create it. You can get the TSQL back out by right-clicking on the primary key in the Keys folder and selecting Script Key as to get another context menu, then Create To, and finally select a location. For this example, use New Query Editor Window but you could have exported it directly to file, copied it to the clipboard so you can paste it somewhere else, or moved it directly into an Agent Job. You can see these menu choices in figure 4.

Figure 4 Menu selections needed to script out an object from the database.
If you script out the object we just created, don’t be surprised when it looks a little different:
USE [MonthOfLunches]

GO

/****** Object: Index [PK_Address] Script Date: 8/20/2011 5:33:34 PM ******/

ALTER TABLE [Management].[Address] ADD CONSTRAINT [PK_Address] PRIMARY KEY CLUSTERED

(

[AddressID] ASC

)WITH (PAD_INDEX = OFF, STATISTICS_NORECOMPUTE = OFF, SORT_IN_TEMPDB = OFF, IGNORE_DUP_KEY = OFF, ONLINE = OFF, ALLOW_ROW_LOCKS = ON, ALLOW_PAGE_LOCKS = ON) ON [PRIMARY]

GO
This is the same index that was created in the script above, but the full set of options that are provided by default get listed out when SQL Server generates the script.
Manipulating these settings is necessary under normal circumstances, and the defaults are just fine. The GO commands are mechanisms for making a query execute immediately rather than being part of a larger batch. Note that the generated code does not include a semicolon to terminate the statements even though this is considered a best practice.
TRY IT NOW Generate scripts from objects within the database. This is a skill you’ll find yourself using a lot.
Primary key on a CREATE TABLE statement
Some of the other tables in our design for our sample MonthOfLunches database don’t have columns to support data relationships. For example, the Personnel.Person table and the Management.Company table should be related in some fashion to the Management.Address table. Let’s fix that by creating a new table. Because a person or a company can have multiple addresses instead of simply having a direct relationship to the Management.Address table with a column in either of the respective tables, we’re going to create what’s called an interim table to set up a many-to-many relationship. That is to say, many different addresses can be associated with many different people or companies. The first interim table will be for the Personnel.Person table. This script will create the table and put a primary key into place at the same time:
CREATE TABLE Personnel.PersonAddress

(PersonID INT NOT NULL,

AddressID INT NOT NULL,

CONSTRAINT PK_PersonAddress

PRIMARY KEY CLUSTERED (PersonID,AddressID)

);
The beginning of the statement should be completely familiar to you. It’s a standard CREATE TABLE statement. The two columns are defined exactly as normal. After that, another comma is added and then the primary key constraint definition is defined. Notice that the syntax is exactly the same as that used with the ALTER TABLE statement. Note that this is a key that consists of two columns. A key with more than one column is referred to as a compound key. The compound key in this case is necessary because we want to ensure that we can add more than one address for a person but that we don’t duplicate addresses for a person.
TRY IT NOW Experiment with using the CREATE TABLE statement to define a primary key for yourself.
Summary
You’ve now established primary keys on all of your tables. Remember the concept of referential integrity requires two things, a unique value on the parent and a relationship to a child table through that unique value.


Thanks for a great, detailed article on primary key handling.
In the article you’re using an
intas the data type for the primary key, which in my opinion is a good choice. In my database table primary keys blog post there is an overview of some considerations for the primary key.I would also like to fill in with the syntax to create an identity column that automatically assigns the next free id:
CREATE TABLE People (

PersonId INT IDENTITY(1,1) NOT NULL

CONSTRAINT PK_People PRIMARY KEY CLUSTERED,

FirstName NVARCHAR(50) NOT NULL,

LastName NVARCHAR(50) NOT NULL

)